2.
Measurement Process Characterization
2.4.
Gauge R & R studies
2.4.3.
Data collection for time-related sources of variability
2.4.3.2.
|
2-level nested design
|
|
|
Check standard measurements for estimating time-dependent sources
of variability
|
Measurements on a check standard
are recommended for studying the effect of sources of variability that
manifest themselves over time. Data collection and analysis are
straightforward, and there is no reason to estimate interaction terms
when dealing with time-dependent errors. The measurements can be made
at one of two levels. Two levels should be sufficient for
characterizing most measurement systems. Three
levels are recommended for measurement systems for which sources
of error are not well understood and have not previously been studied.
|
|
Time intervals in a nested design
|
The following levels are based on the characteristics of many
measurement systems and should be adapted to a specific measurement
situation as needed.
- Level-1 Measurements taken over a short term to estimate gauge
precision
- Level-2 Measurements taken over days (of other appropriate time
increment)
|
|
Definition of number of measurements at each level
|
The following symbols are defined for this chapter:
- Level-1 J (J > 1) repetitions
- Level-2 K (K > 2) days
|
|
Schedule for making measurements
|
A schedule for making check standard measurements over time (once a day,
twice a week, or whatever is appropriate for sampling all
conditions of measurement) should be set up and adhered to.
The check standard measurements should be structured in the
same way as values reported on the test items. For example,
if the reported values are averages of two repetitions made
within 5 minutes of each other, the check standard values
should be averages of the two measurements made in the same manner.
|
|
Exception
|
One exception to this rule is that there should be at least J = 2
repetitions per day, etc. Without this redundancy, there is no way
to check on the short-term precision of the measurement system.
|
|
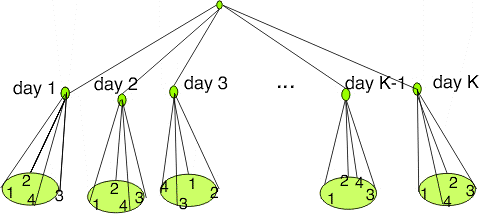
Depiction of schedule for making check standard measurements with 4
repetitions per day over K days on the surface of a silicon
wafer
|
 K days - 4 repetitions
2-level design for check standard measurements
|
|
Operator considerations
|
The measurements should be taken with ONE operator.
Operator is not usually a consideration with automated systems. However,
systems that require decisions regarding line edge or other feature
delineations may be operator dependent.
|
|
Case Study: Resistivity check
standard
|
Results should be recorded
along with pertinent environmental readings and identifications for
significant factors. The best way to record this information is in
one file with one line or row (on a spreadsheet) of information in
fixed fields for each check standard measurement.
|
|
Data analysis of gauge precision
|
The check standard measurements are represented by
$$Y_{kj}(k=1, \,\ldots, \, K, \,\, j=1, \,\ldots, \, J) \,\, ,$$
for the jth repetition on the kth day. The mean for the
kth day is
$$\overline{Y}_{k \, \small{\bullet}} = \frac{1}{J}\sum_{j=1}^{J} Y_{kj} \,\, ,$$
and the (level-1) standard deviation for gauge precision
with \( \nu = J -1 \)
degrees of freedom is
$${\large s}_k = \sqrt{\frac{1}{J-1} \sum_{j=1}^{J} ( Y_{kj} - \overline{Y}_{k \, \small{\bullet}} ) ^2} \,\,\,\, . $$
|
|
Pooling increases the reliability of the estimate of the
standard deviation
|
The pooled level-1 standard deviation with \( \nu = K(J-1) \)
degrees of freedom is
$${\large s}_1 = \sqrt{\frac{1}{K} \sum_{k=1}^{K} {\large s}_k^2} \,\,\,\, . $$
|
|
Data analysis of process (level-2) standard deviation
|
The level-2 standard deviation of the check standard
represents the process variability. It is computed with
\( \nu = K - 1 \)
degrees of freedom as:
$${\large s}_{chkstd} = {\large s}_2 =
\sqrt{\frac{1}{K-1} \sum_{k=1}^{K} \left(
\overline{Y}_{k \, \small{\bullet}} - \overline{Y}_{\small{\bullet} \small{\bullet}} \right) ^2} \,\, ,$$
where
$$\overline{Y}_{\small{\bullet} \small{\bullet}} = \frac{1}{K} \sum_{k=1}^{K} \overline{Y}_{k \, \small{\bullet}} \,\, .$$
|
|
Relationship to uncertainty
for a test item
|
The standard deviation that defines the uncertainty for a single
measurement on a test item, often referred to as the reproducibility
standard deviation (ASTM), is
given by
$$ {\large s}_R = \sqrt{{\large s}_{days}^2 + {\large s}_1^2} = \sqrt{{\large s}_2^2 + \frac{J-1}{J} {\large s}_1^2} \,\, . $$
There may be other sources of uncertainty in the measurement process
that must be accounted for in a formal
analysis of uncertainty.
|
 K days - 4 repetitions

